Build an event calendar
An event calendar shows the events of your region on your website: a searchable, filterable list of event cards with a date filter, and a detail page for each event. You don't build it from scratch. You combine three discover.swiss building blocks and configure them:
| Building block | What it does |
|---|---|
| Infocenter View | A saved search in the Infocenter that defines which events belong to your calendar, e.g. all events of your project in a region or category. You create it in the Partner Portal. |
Landing web component <ds-landing> |
Shows the events of the view as cards, with free text search, facet filters, a date range filter and paging. |
Event detail web component <ds-event-detail-page> |
Shows one event with images, description, dates, location, prices, booking links and more events in the region. |
Both web components are native custom elements. They work in any website or web application, independent of the framework the page uses, and render inside a Shadow DOM so their styles don't affect your page.
Info
If you only want to see what it looks like first, open the landing web component demo.
Architecture
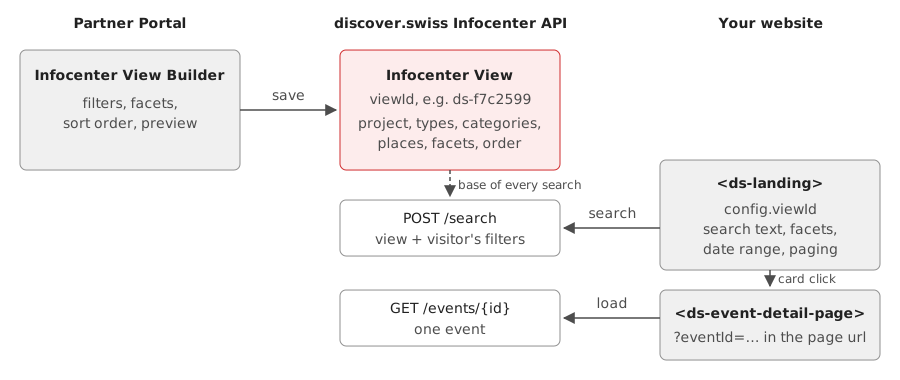
- In the Partner Portal you create an Infocenter View: a saved search request with the filters, facets and
sort order of your calendar. The Infocenter stores it and gives it an id, e.g.
ds-f7c2599. - On your website,
<ds-landing>gets that id asviewIdin its configuration. Every search it sends to the Infocenter search API contains theviewId. The Infocenter uses the view as the base of the search and applies what the visitor selects (search text, facets, date range, page) on top of it. The visitor can only narrow the result down, never see events outside the view. - When the visitor clicks an event card, the landing component shows
<ds-event-detail-page>in place of the list and puts the event id into the page url (?eventId=…). The detail component loads the event from the Infocenter API. The url can be bookmarked and shared, and the browser's back button returns to the list.
Because the view lives in the Infocenter, you can change which events your calendar shows, e.g. add a category, in the Partner Portal without touching your website.
What you need
- A discover.swiss partner account with access to the Partner Portal.
- The Infocenter Views service for your organization, ordered in the Partner Portal.
- An API subscription key for the Infocenter search, see Get access.
- Your Infocenter project, e.g.
demo-web. On the Infocenter API the project is mandatory.
The subscription key is sent to the API from the visitor's browser, so anyone who opens your page can see it. Use a key meant for public front-end use.
Environments
| Environment | Infocenter API (infocenterUrl) |
Web component scripts |
|---|---|---|
| Production | https://api.discover.swiss/info/v2 |
https://cdn.discover.swiss/webcomponents/general/ |
| Test | https://api.discover.swiss/test/info/v2 |
https://cdn-test.discover.swiss/webcomponents/general/ |
Views, subscription keys and data are separate per environment. See Environments.
Distribution View
With a regular Infocenter View, the calendar runs on your own website. The Infocenter Distribution View service lets you show a view on external, partner-related websites, e.g. a municipality or an event organizer that publishes the events of your region on its own site, without that partner integrating the Infocenter itself.
Technically, a Distribution View is used exactly like a regular view: the external website embeds <ds-landing>
(and optionally <ds-event-detail-page>) with the viewId of your view, following this guide. To set it up, order
the Infocenter Distribution View service in the Partner Portal. Contact support@discover.swiss
for the subscription key and project the external website should use.
Steps
- Create an Infocenter View for your events.
- Add the landing web component to your page and set the
viewId. - Add the event detail page.
- Compare with the complete example.